Rebuilding the Century 21 PTO / Vernier

(Click on any picture to get larger, high-resolution version)
by Monty Northrup, N5ESE
by Monty Northrup, N5ESE
| NOTE: 'N5FC' is my former call. This project was constructed while that call was valid, and you may observe references to it. |
The Ten-Tec Century 21 transceiver is a great CW rig, with good sensitivity and flexibility. It has its eccentricities, but all-in-all, it's an inexpensive workhorse. One of this rig's really strong points is the PTO (Permeability-Tuned-Oscillator). It's a very well-designed unit, with good linearity, good thermal and mechanical stability, and smooth tuning. But one of the things which happened with mine (which I understand is quite common), is that the PTO's vernier drive starts slipping. I lived with this problem for a year or two, until it reached a level of annoyance that motivated me to call Ten-Tec. It turns out they have a repair kit for just this problem (call the "PTO Repair Kit"). It only cost about $20, which seemed more than reasonable to me. Inquiring how much it would cost for them to do the repair, I was told "about" $100. Was it do-able by Joe A. Ham? Yes, they promised. So I parted with my $20, and got the kit.
This narrative (with its attendant pictures) is intended as an overview of the PTO rebuild operation, and not as a step-by-step. In fact, it's quite possible there are some mistakes buried in this verbage, because I created the web page 3 months after the rebuilding exercise, from notes I had chicken-scratched into the margins of the kit instructions. Be this as it may, it's our hope that this page might help someone understand the level of effort required for correcting this problem, at which time they can better decide whether to "do-it-yourself". Ten-Tec provides detailed step-by-step instructions, which include removing the PTO from the chassis, disassembling and cleaning the PTO mechanical parts, reassembly, and alignment.
If you're thinking about rebuilding the vernier without the kit, I wouldn't recommend it. My PTO had several badly worn parts, some even mis-shapen by wear. But you could conceivably get some improvement simply by cleaning and re-greasing the unit (although I have no idea what kind of grease is suitable)
This job is not to be taken lightly. There is a lot of disassembly/reassembly involving teensy-tiny parts. You need good eyes, good mechanical skills, and patience. Lots of hams have these attributes; some don't. Plan on spending a whole Saturday on this. If things go ultra-smooth, and you're very adept mechanically, you'll have the afternoon off. If your mechanical skills are average (like mine), better to take your time and do it carefully and correctly... Saturday's gone.
What Ten-Tec Supplies in Kit
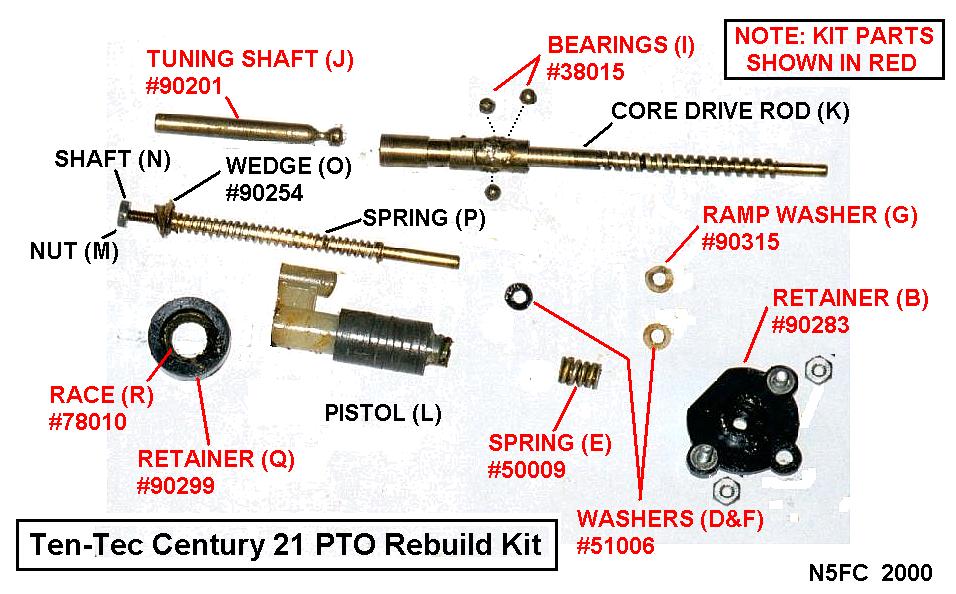
Instructions are printed on five letter-sized sheets. They're good step-by-step instructions, and there's a blow-up sketch of the piece parts of the PTO, with part numbers and reference letters, so you can visually identify the parts called out in the step-by-step. The drawing is essential, because the verbal description is sometimes vague or confusing. However, whenever a part is called out in the step-by-step, a letter reference is attached in parentheses (B), so you can identify the part shape and location from the sketch.
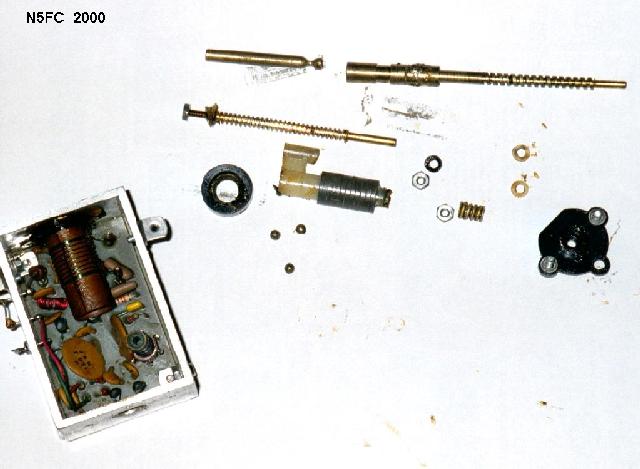
The kit comes in a small zip-lock baggie. CAUTION! There are about a dozen very tiny parts, so don't dump them out too casually, or you'll end upsearching for lost parts in the carpet. Here's an annotated picture of the parts supplied in the kit... actually, the picture shows the old parts which would be replaced or cleaned (that's why they're so ugly). The parts supplied in the kit are annotated in red. (There are 4 washers and a tiny roll pin not shown in this picture)
Removing the PTO
I guess it's kind of obvious, but the first thing you have to do to remove the PTO is take both upper and lower covers off. You'll also have to remove the front panel. There's a procedure in the Century 21 manual for this (page 3-1). Then you remove the dial (assuming the analog version. like I have) and note its position. I put the dial in a known position at the low-frequency end first.
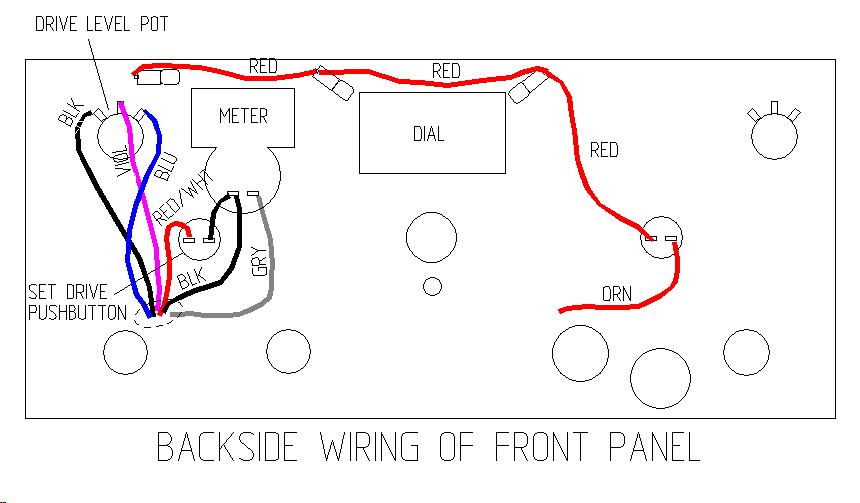
In order to fully remove the front panel, there are some wires to unsolder on the DRIVE-SET pushbutton and dial lamps and meter (maybe a few others). I made a sketch of the back of the front panel (the side where the wiring is) so I would be able to hook these back up; here's my sketch (your version may vary):
When you get the front panel off, there's another panel right behind it, a structural piece where hardware etc. is mounted. I got a picture of that (with the outer front panel removed) so you can see where the gears go. A detail follows, to give you a closer look at the gears and dial-locking-lever and spring. Hopefully these pix will help if you forget how they came off.


PTO Disassembly
In the first sheet of Ten-Tec's Instructions (on the removal of the PTO), step 4 calls for you to remove the FRONT END board. I looked at it, and decided there has to be a better way. As a result, I removed the PTO without removing the front-end board, as follows:
        Remove the screw from the left-rear mounting
        flange of the PTO (No. 4 x 3/8 sheet metal screw).
        Remove the wire (ground) from the rear of the
        Audio Preamp.  Remove the audio preamp just
        far enough to gain access to the other PTO
        mounting screw, and remove it.
After removing the two mounting-flange screws that hold the PTO to the chassis, I removed two 4-40 x 3/4 screws that hold the PTO to the inner front panel. Then, after removing the drive gear from the PTO shaft, and disconnecting the three wires going to the feedthrus on the side of the PTO, the PTO is free, and ready for rebuilding.
At this point, the PTO looks like this:
This is wehere the real work begins. You'll move to Ten-Tec's "REBUILDING OF PTO" document, and refer to the Ten-Tec sketch as you work. I have very few notes to add to their procedure (but I did made a few):
In step 1 & 2, where you remove two screws (4-40 x 1/2") and washers from the rear of the PTO, the washers are steel, and the washers on mine were placed between the nylon retainer cap (B) and the PTO chassis. You'll want to note how this is done on yours (there may even be double washers). Step 3 makes reference to the nylon retainer cap (B) being re-used, but one was provided in my kit.
In step 3, ramp washer (G), I made a note that the flat of the washer goes toward the outside of the PTO.
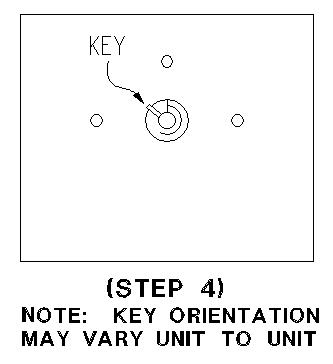
Step 4 is an important step, in which you remove the tiny roll-pin that serves the "stop" function. You can';t pull out the shaft until this pin is removed. Ten-Tec cautions you to note its orientation so you can replace it the same way. Of course, yours may be different, but I made a sketch of mine, which follows:
Once you have the key out, the tuning shaft can be pulled out, at which time the 3 ball bearings are exposed. Chances are they are pretty grungy, but they'll be replaced later. After removing the tuning shaft (J), the pistol/core assembly can be removed. All this is explained step-by-step in the instructions. When you get all diassembled, it's going to look a lot like this (see the image presented earlier for parts identification):
Cleaning
You can clean the loose metal parts with whatever detergent or degreaser or solvent you have on hand. Don't use any kind of solvent (except alcohol) on the non-metallic parts. When using alcohol, I use 70% isopropyl, available from the drug store. 90% would be better, if you can find it. Just be sure not to use the stuff that's colored (instead of clear; who knows what's in the coloring?) And don't get anything except alcohol anywhere near the electronics. I used Dawn and an old toothbrush on everything except the pistol (L), which appears to be phenolic (I didn't want it absorbing the detergent). Ten-Tec suggests using Q-tips and alcohol for cleaning the pistol assembly (L). It's important to get these parts really clean, and to inspect them thoroughly for damage (if they're not being replaced by the kit). Pay attention to crevices. This is the longest part of the job, because this gunky, dried-up grease sticks to the parts like epoxy.
Reassembly
After cleaning, wash your hands and clean up the area. You won't want old grease and dirt getting back into your assembly because you were careless about this.
Hopefully, you were paying close attention (and maybe even taking notes) as you were disassembling, because the reassembly is important to the proper operation of the vernier. Ten-Tec gives you a packet of green grease with your kit, and there seems to be more than enough of it. The instructions lead you through what to grease and in what sequence. In general, you'll end up greasing the pistol (L) threads, the shaft (N) and it's spring (P) and the wedge (O), and the core drive rod (K). The wedge (O) is not provided in the kit, but it's a nylon part and mine was somewhat worn and distorted, but not so much that it couldn't be used. You may want to inspect that part carefully and ask Ten-Tec to replace it if necessary (they're very good about such things, and often won't even charge for it). Naturally, the tuning shaft, ball bearings, and bearing race will also get greased. In fact, you'll probably use the grease to hold the ball bearings in place while you re-assemble the shaft into the PTO (careful that you don't lose them!).
As Ten-Tec points out, there's a few places where you should be careful. Don't do anything to affect the large coil windings on the PTO tank circuit. Don't damge the PTO circuitry. Don't force anything (it should fit), because you don't want to bend shafts or score moving or mating parts. When you super-glue the race-retainer assembly (R & Q) in place, don't use too much glue, or it will get where it shouldn't be. (By the way, superglue is not part of the kit).
Getting the shafts back into place and aligned can be a tad tricky. Take your time, be gentle, understand and follow the instructions carefully. When the shaft is in place, you'll be asked to exercise the tuning through its range several times. This works the grease in thoroughly and evenly. Hopefully, by the time you've done this a few times, the tuning will be smooth, with no rough spots, and your vernier dial will work once again (you'll be so happy!)
Before reinstalling the PTO (at least with the analog version), you're asked to turn the PTO shaft fully counter-clockwise, and install the tiny roll pin (H) that was removed earlier, in the same orientation as it was before. (remember the picture?). When you reinstall the drive gear (for the dial), you secure it with about 0.05 inches (50 mils) space between the gear and the PTO housing.
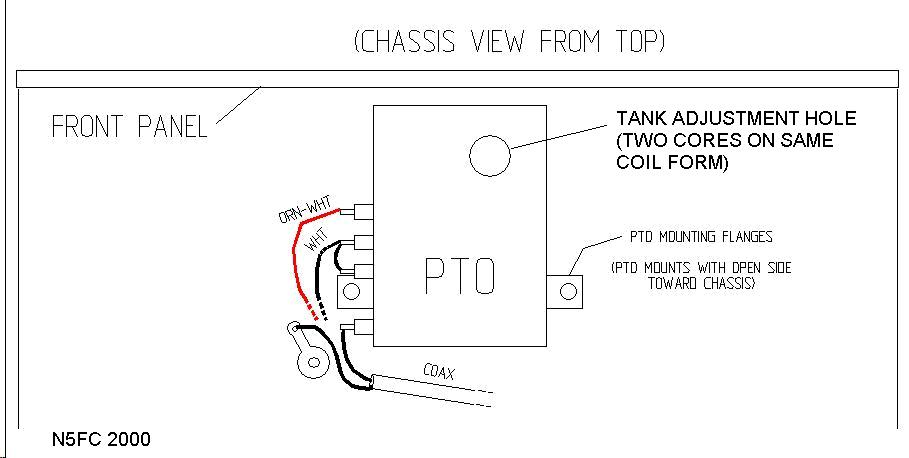
Then you reinstall the PTO into the chassis, reversing what was done earlier, and reconnect your wiring. Here's a picture of the wiring on my PTO:
Alignment
When I finished my assembly, I put the unit together without aligning it, just to see how far off I was. I was about 8 KHz high at the low end of the band, and about 17 KHz high at the high end.
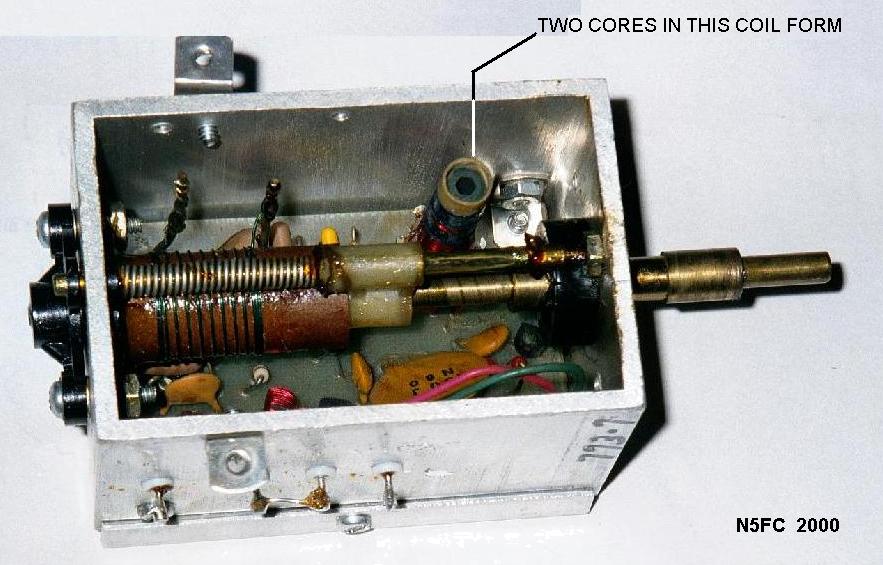
Ten-Tec points you to page 3-14 in your Century 21 manual for re-alignment of the PTO. You'll need one of those alignment tools with the hex head on the end and a skinny shaft. When you align the tank inductance, you'll tweak two cores in one coil form. One core is under the top core, and you have to insert the alignment tool through the top core into the bottom one. Then you tweak one for dial accuracy (at one band end), and tweak the other core for band-width (i.e., 500 KHz band end-to-end). I tried using the Radio Shack alignment tools, but they were so ill-made that the hex wouldn't grab the "underneath" coil well enough to do an alignment. You might want to ask Ten-Tec what they recommend (hey, maybe they stock them). When complete, you should have a dial that's accurate to within a KHz or so.
Also, it's not obvious from Ten-Tec's narrative, but you can do gross alignment of the dial by pushing down on the dial-lock-lever with a long screwdriver inserted from the top between the outer and inner front panels (see the picture under "Removing the PTO", above)
Summary
Renewing the vernier drive on the Ten-Tec Centrury 21 really can be done by Joe "Average" Ham. It's tedious, but it's also rewarding; after years of tolerating the slippety tuning, I have the good-ol' smooth tuning back.
73, and break-a-leg! -- monty
Other Related Pictures
Here's pix of my Century 21 (assembled, of course!)
Click on above image for larger version

Click on above image for larger version
73,
Monty N5ESE
dit dididit dit