Recently, at our local QRP club meeting, someone joked that it would be a marvelous sight to see all our various Altoids-packaged projects connected together to form a station. We all chuckled at the visual suggestion, but later I got to thinking more along those lines.
What I propose here, as an outgrowth of that interesting suggestion, is a project I have dubbed the "Club Sandwich". As the title implies, the project is intended for amateur radio clubs. It provides a unique opportunity to exercise individual creativity under the umbrella of a team project, increase overall knowledge of radio system hardware design, and provide a continued base for experimentation in the club. The most promising and rewarding aspects, however, may well be the opportunity for increased comradery, renewed interest in club activities, and just plain ol' radio-fun. As conceived, the project is sure to interest both newcomer and old timer alike, and bring the two together.
The Club Sandwich takes the form of a simple construction project; in our example, a QRP CW transceiver. It is composed of several smaller sub-projects, representing modular functions, to eventually be connected together to form a working transceiver. Imagine a half-dozen or more Altoids boxes, interconnected with shielded cables. Larger clubs may want to consider more complex projects. When completed, it may be used for field day, or "checked out" by members for a short time.
The specifics of the project should be tailored to the interests and skill-levels of the club membership. Common hardware elements should be defined, simply so everyone is on the same page, interconnection wise. Likewise, it's important to have a technical goal (sometimes called a "specification") and a plan to go with it (sometimes called a "system design"). I hestitate to use the latter terms, because informality should be modal in a project like this. Aside from the specifics of the hardware and design, there are some intangible but esssential elements for the Club Sandwich; we'll speak in terms of of our example, a QRP CW Transceiver:
- Modular Construction - The transceiver is broken down into well-defined, weekend-sized construction projects (OK, sub-projects), to be constructed by individuals or small teams, in their own spare time.
- Flexibility - Modular sub-projects can be removed and replaced readily to facilitate experimentation and improvements.
- Compatibility - A system design approach ensures common elements (like interconnecting hardware, power supply voltages, and input/output specs).
- Utility - While the construction techniques and layout may be unconventional (or even bizarre), the transceiver will ultimately be usable, and suitable for on-the-air operations.
- Charm - What could be more charming than a half-dozen or dozen Altoids-boxes linked together to form a working piece of ham gear?
- Uniqueness - No two "Club Sandwiches" will be alike; they will reflect the skills, ingenuiity, and humor of the members of that unique club.
- Renewability - as time passes, modules may be added or replaced, resulting in an entirely "new" project, while re-using elements which remain suitable for the current application.
Begin by assigning a team coordinator. Did I say assign? OK, elect or proclaim a volunteer as your team coordinator. If at all possible, that should be a person with good people skills and broad technical experience. This is the person who will coordinate the participating members, and keep the "big picture" in mind should things go astray. Once you've selected your team coordinator, you're ready to begin.
The "system design" approach suggested here is loosely based on proven techniques used in commercial engineering. System design consists simply of the following: Agree on the goal, formulate a plan, produce a preliminary design, implement the prototype, test and modify it, integrate the system, and document what you've got. In the case of the Club Sandwich, individual modules are designed, built, tested, and documented by individual club members on their own time (though perhaps with the help of a mentor or assistant). Integration of individual modules is done at a club meeting, so the project can be appreciated and discussed by all. Let's look at these individually:
- Agree on a Goal - Figure out (together) what your project will be. This need not be formal, but try to find something that everybody who wants to participate will enjoy, both during and after construction.
- Formulate a Plan - Let an individual with homebrewing experience (or a committee of like individuals), come up with a "plan of attack". This means figure out how to reach the intended goal, while breaking the project into bite-size pieces. A Block Diagram will suffice as the "output" of this step, with a copy going to each participating club member. An input/output specification for each module (or block) would enhance the future success and forestall a lot of unnecessary questions. The plan is considered "in place" when the majority of modules and tasks have been assigned to individuals. Again, keep in mind, all assignments are predicated on volunteerism (and I don't mean that like the Army means it). We'll address the formulation of a Block Diagram below, under another heading.
- Produce a Design - Here, the individual (or small team), breaks out the books, magazines, and the calculator, and selects or designs a circuit that will do the assigned task of the module. Quite likely, they'll put a pencil to a greasy yellow sheet of paper, and make a list of needed parts. Obviously, since there are many modules involved, there will be many individuals working independently at this point. This could take several months, with monthly meetings being used to network with others and get help or confirmation for the design, if desired.
- Implement a Prototype - To do this, the individual procures parts for her/his module, and puts it together. This also could take several months, with show-and-tell of progress at club meetings. Be sure to network with others, to trade parts and minimize costs.
- Test and Modify the Prototype - Again, this is an individual process, performed on the individual module, and could take a while, depending on the skill levels involved. It's very important to network, via e-mail or eyeball, or at club meetings, so that individuals can successfully accomplish testing without frustration. This is an opportunity for members who have good test equipment to connect with those who do not. The outcome of testing is almost always modification, so don't be surprised when that's the case.
- Integrate the System - When enough modules have been constructed by individuals, it'll be time to hook them together, apply power, and wait for the music (or the CW). Best to do this at a club meeting, where everybody can share in the triumphs of individuals and club.
- Document What You've Got - As a minimum, the individual constructors should provide the greasy schematic with parts values, and part numbers for unique parts. Put it in a common notebook to accompany the equipment. Somebody in the club simply must volunteer to be a photographer (ya gotta have pix!). If the club or a club member has a web page, try to post the documentation so the whole world can admire your work.
The Block Diagram is probably the easiest way to "put-down-on-paper" what you specifically want to accomplish. I suggest one block for each assignable sub-project (module). I also highly recommend a set of written input/output specifications, so people constructing the individual modules understand exactly what's coming at them, and what they're expected to provide. This is all really pretty simple, but worth the time and effort in the long run. At the bottom of this page, I'll provide an example, based on a QRP CW Transceiver, which you may review as a model for your own project, or adopt outright.
When creating the block diagram, keep the following in mind:
- Overall Functional Goals - Club members should agree on what they want the final hardware to do. Always keep these goals in mind. HINT: Start simple, but keep future expandability and re-usability in mind.
- Modularity - Break your transceiver into small, workable sub-projects. Think of what can be constructed in a weekend. Consider the ability to replace any stage in the future, should someone want to experiment or improve the design.
- Form Factor - Agree on the packaging methods. We suggest the Altoids-boxes (or similar) for enclosing each sub-project. This forces the projects to be small, simple, workable units, and the metal box is dirt cheap, widely available, and provides excellent shielding.
- Interconnections - Agree on how stages will interconnect, and define that for each stage in the design (each block or module). We suggest RG-174 and RCA phono jacks/plugs wherever possible, because they are cheap and readily available. For RF power stages, we recommend BNC hardware, for equipment compatibility and good shielding. And for power, we recommend 5.5 x 2.5 mm barrel-type power connectors, for their availability and universality.
- I/O - Define all inputs and outputs for each module. By specifying input and output impedances and expected output levels, you assure that any element can be replaced in the future by a new design. Don't forget control signals... these can really mess you up if they are not defined. But keep in mind that you want to give the individual designer/constructor maximum freedom, and don't narrow things down so much that their creativity is stifled.
- Power - Agree on the power requirements. We suggest 9-15 V, so that any module may be operated on a 9V battery (for testing), and a 12V battery that's charging.
- KISS - (Keep It Simple, Silly) The "Club Sandwich" is intended to be a fun, team project, not an engineering breakthrough. Keeping it simple is part of the challenge (and reward).
- KIRC - (Keep It Really Cheap) By keeping the sub-projects small and using inexpensive components, you'll increase participation among members and encourage sharing designs with the general ham population.
- TEAM - OK, we all know what this means, right? Find a way to include every club member that wants to participate. Some may not want to build a module, some may only want to do paper design; some will help with documentation or provide parts, or mentor another.
- TIME - Keep the timetable loose and flexible; with busy personal schedules, and given the volunteer nature of the membership, along with the different skill levels involved, this project can take several months. If an enthusiastic and skilled member has more time, and gets done early, create new modules, different versions of the same module, or assign them to mentor.
Once the block diagram is drawn, make a list or table of the requirements for each block element. This will form the module specification. Include:
- The name of the sub-project
- Its function (i.e., Mixer, Receiver Preamp, IF amplifier with AGC, etc)
- Name all I/O ("RF in", "AF Out", "Key In", etc)
- For each I/O port, define frequencies, impedances, and expected signal levels
- For each I/O port, define what connectors are to be used
- Any required operator controls ("Tune", "Gain", "On/Off")
- Any special or internal specifications (though we like to leave this to the individual)
- Expected power supply range
When creating the block diagram and module specs, stay flexible, but keep the "big picture" in mind. Individuals may want to alter their module's specifications, and in some cases this will certainly be warranted. But in a project like this, changing specifications can have a ripple effect. For example, let's say the person building the keying circuit decides to use 5 Volt logic, when 12 V was specified. Now, every module that used keying (and there are many) will need to be redesigned. It is the job of the team coordinator to "see the big picture" and steer individuals back to a reasonable solution.
This is not to say that individuals constructing sub-projects do not have latitude. In fact, they have a lot. Circuitry, parts selection, and construction methadology are all at the descretion of the individual or sub-project team. Want to do something innovative? Do it! Use proven methods! Go ahead! Use surplus parts? Why not? Use an exotic sample? Who's to stop you? Machine your own capacitors? Grow your own silicon? More power to you. The point is, there's a lot of room for individual expression here, while staying within the agreed guidelines and specifications.
Every participating individual should receive a copy of the block diagram. This helps them keep the "big picture" in mind, a valuable reminder when you're designing and building a part of the whole. As the sub-projects are completed, give each individual a chance to "show-and-tell", and put their schematic and parts notes into the comprehensive project notebook. Make sure their name and call are on the paperwork. Hand-drawn schematics and hand-written notes are fine.
This is guaranteed to be a learning experience for every club member. Members who have no building experience will have to crack a book, and ask questions. Experienced builders will have to work within the bounds of specifications, expand their horizons, and help others. Everyone will see how their little piece support the whole, whether it be a piece of hardware, some documentation, the acquisition of parts, or some individual expertise.
As a starting point, we offer the attached block diagram of a QRP CW Transceiver. Frequencies have not been specified; you should select a band, and decide on an IF frequency. We suggest, for starters, 40, 30, or 20 meters. Use cheap microprocessor crystals for the IF filter and mixer injection, all the same frequency. If you use both transmit and receive mixers (as shown in the example), you'll generate sidetone directly. If you want to keep it really simple at first, ditch the IF and build a direct-conversion receiver, and/or use a VXO for your transmit source. We'll go all the way with our example, showing a single band, 3-5 Watt CW transceiver, with good flexibility and expansion capability to SSB or digital modes. We'll show a conventional VFO, but there's no reason a DDS or PLL couldn't be substituted (thus getting the digital and software types involved). Or, build all 3 individually, and try them all out (that's the power of modularity). Here's our Block Diagram:
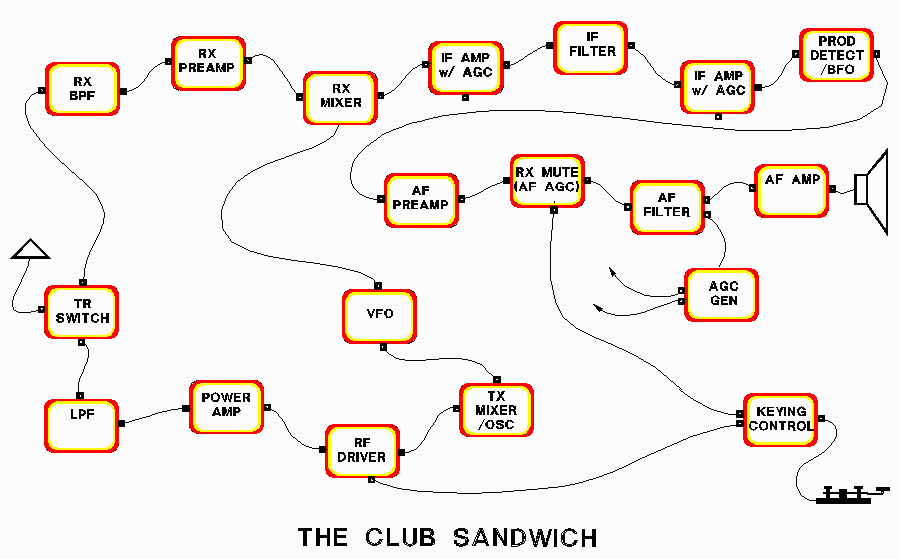
Click -here- for the block diagram and block specifications on one complete web page
Click below on the block/module names below for a sample specification of a particular block:
Receiver: RX BPF
Receiver: RX PREAMP
Receiver: RX MIXER
Receiver: IF AMP w/ AGC (1)
Receiver: IF FILTER
Receiver: IF AMP w/ AGC (2)
Receiver: PRODUCT DETECTOR / BFO
Receiver: AF PREAMP
Receiver: RX MUTE / AF AGC
Receiver: AF FILTER
Receiver: AF AMP
Receiver: AGC GENERATOR
Transmitter: TX MIXER / OSC
Transmitter: RF DRIVER
Transmitter: POWER AMP
Transmitter: LOW-PASS FILTER
Misc: VFO
Misc: KEYING CONTROL
Misc: ANT T/R SWITCH
Misc: SIDETONE GEN
Click -here- for the block diagram and block specifications in printable MS Word format (228 KB, 14 pages)
Hope all this generates some interest, and spurs on all you latent homebrewers ;-)
73,
monty N5ESE